|
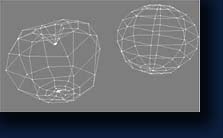
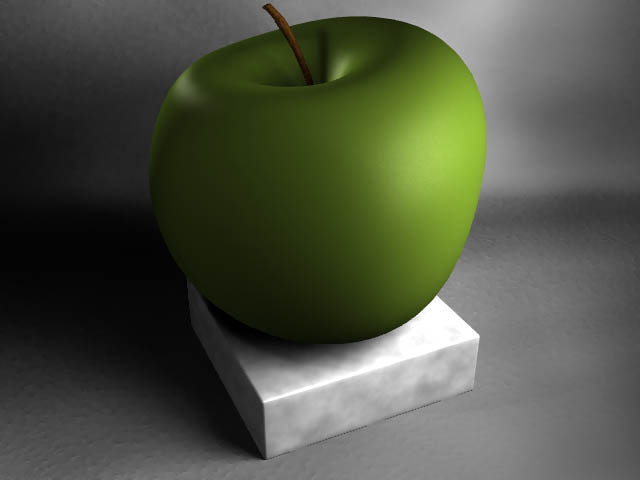
The apple model itself is quite simple. just a sphere with the ends pulled into itself to form a more torus shapped object. As with an organic object remember perfection is not perfection. Drag ({ctrl} t) the points around, make use of the modify tools with fall-off settings(press n for the numeric panel) to get a shape aprox like the one shown. and subpatch it ({tab}) |
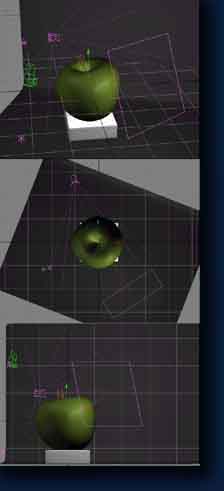 |
I've shown the lighting setup. Its a basic 3 light setup with an add fill. The key light is to the front and to the right of the object and is a area light. Theres a spotlight set behind slight above and to the left, as a back light, or a rimlight to highlight the back edges of the apple to define the geometry. theres two point lights to act as fills, set in front and to the left. With the fill lights turn off the affects specular in the lights properties, in life this is done with a diffuser over the light. both are set to about 50% intensity.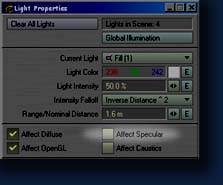 |
|
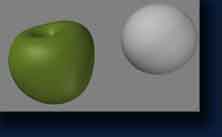
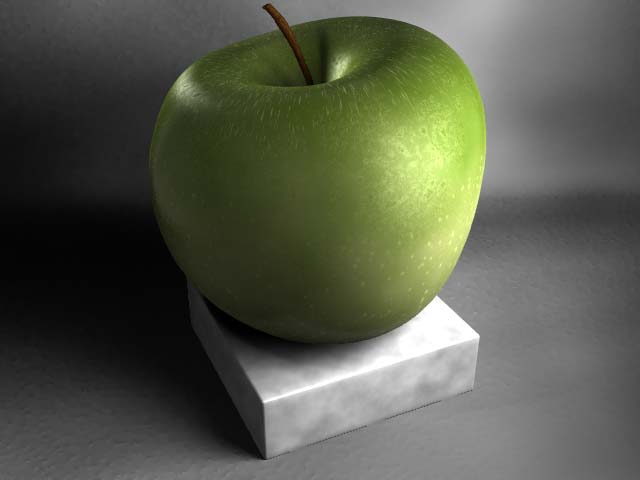
And now the key to any good model. The texture. In this case mostly procedural. At this point you should be in layout with your lighting setup. Open the surface editor And choose your apple's surface. Since this is a granny smith apple, its a pretty solid color green, We'll start with a basic green color. Set the Color to RGB(101, 129, 037) | |
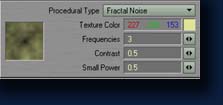 |
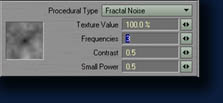
Click on the T beside the color channel. Add procedural texture layer. The first of many. The first is a fractal noise. Set the color to RGB(227, 230, 153) and set the scale to about a quarter of the height of the model. You can use {ctrl}-q in modeler to measure it. All the other settings are default. This is just to mix up the color a little. few things are one perfectly solid color. |
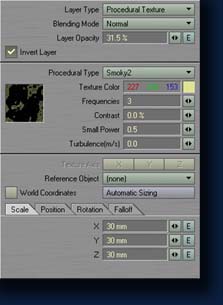 |
Without seeing an apple its hard to describe what Im talking about here. Add a Smokey2 procedural with a very small scale, to act as small dots on the surface of the skin. Color it RGB(227, 230, 153). And set the layer opacity to about 30%
|
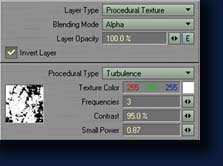 |
Next we'll add a turbulence layer, with a high contrast value of about 95% and the color to pure white, rgb(255, 255, 255) Important here is that you change the blending mod to alpha and make sure it appears before(above) the smokey2 layer in the order of layers. This layer acts as a clip map for the smokey texture. This makes the small dots appear in different areas of the apple and not others, once agian to give it an organic feel.
|
 |
The next few layers will be image maps, and unfortunatelly I wont be going into detail how to create this, though theyre simple in concept. I have included links to download mine. That said lets proceede. Add an image map layer, AppleTop.psd, this will be top most in the layer order. Its a planar projection on the Y axis, the scale is slightly smaller than the diameter of the apple. Change the Width and Height Tile to Edge, to keep it from repeating. Also change the layer opacity to around 55% and set the blending mode to additive. Setting it to addititive is an easy way to make the dots blend in. Adding black(RGB(0,0,0)) to anything wont change it and adding white with low opacity means it will make the layer underneath that much brighter. These are larger dots the are elongated along the upper dimple of the apple. |
 | Add another image map layer, AppleSide.psd, this one raps cylindrically around the Y axis. Change the Width wrape amount to 4 and the Y scale to about the same as the heigh of the apple. This map is pretty much just white dots that fade out toward the top of the map. Set the layer opacity to about 50% agian, as well as the blending mode to additive. |
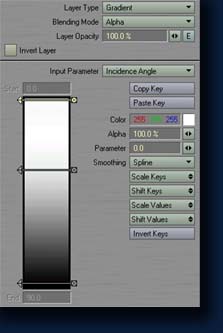 |
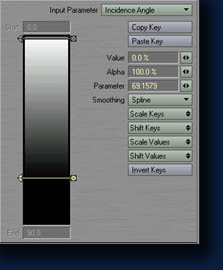
We move on to a slightly more interesting layer. This is a gradient that will appear just before the previous AppleSide.psd image map layer. Set the blending mode to Alpha so to, agian act as a clip map. Only this time we'll base it on the Angle we look at the apple from. Set the input parameter to Incidence Angle. You'll need 3 keys the top key color will be set to pure white, the bottom key color to black, and a middle key color to about rgb(236,236,236) and the parameter to around 33. The white areas lets the layer beneath show through. You'll notice that the start on the gradient is 0.0 and ends on 90.0 this means degrees varient from the direction of the camera. On a sphere the middle will be perpendicular to the camera, that is to say the polygon will be at a right angle to a straight line projected straight out from camera. That is 90 degrees on our gradient. This means along the edges the prev layer will show through. Either take my word for this or look at a real apple.
|
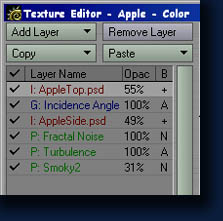 |
Thats all for the color channel, and its just one of many. Just to clarify the order of the layers its goes. AppleTop.psd Incidence Angle AppleSide.psd Fractal Noise Turbulence Smokey2 |
 |
Moving down the channels click the T beside the diffuse channel. This is a simple one. Add a fractal noise channel, with the scale to about a quarter of the diameter of the apple. This breaks up the amount of white light is reflected off the surface, in general terms it controls how difference there is between the light and dark areas of the object
|
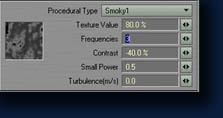 |
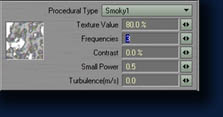
Add a texture(click the T) to the specular channel, Add a Smokey1 texture, with a small scale, about 80mm if your apple diameter is about 2m. Set the contrast to -40%. Specular is how "shiny" an object is, by adding a texture we control that some pts on the surface are shinnier than others, it adds realism. As noted before perfection in nature is not perfection
|
 |
We now look to the reflection channel. Add a Incidence Angle Gradient as before. This time we only need two keys. We don't want the apply very shiny so we make the top key value 15% and the bottom key 0% and the parameter to 70 degrees. This basicly makes the edges shiny a small bit. Hit "Use Texture". Now flip over to the Environment Tab from the Basic tab we were on. Set the Reflection Blurring value to around 50%. This means the reflections we see in the apple are slightly blurred for realism, since an apple is anything but a mirror, the more "buffed" look you want for your apple, turn downt he blur.
|
 |
Lastly we have the the bump layer, the most common, next to the color, I should say. a single Smokey1 with a small scale, again, around 80mm if the diameter is about 2m. Hit "use texture" change the bump value to about -25%
|
 [flat] |
 [color] |
 [specular] |
 [reflection] |
 [bump] |
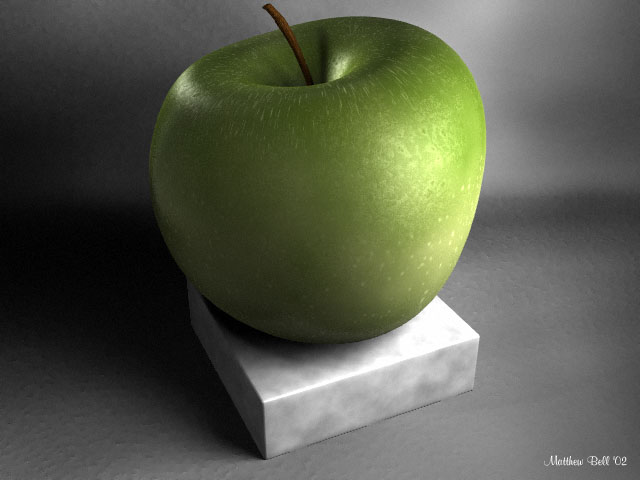
Matthew Bell - '02